


Having sold over 176 million copies as of 2019, Mojang’s sandbox adventure game – Minecraft, is the second-most popular video game in the world after Tetris.
The game has wildly captured the imaginations of kids, parents, and even school educators since its release in 2011 – and the craze continues to blaze.
But why is Minecraft so popular? Unlike most video games, it offers players unlimited possibilities to create a 3-dimensional world using a variety of different blocks – a task that requires a lot of creativity.
It’s also an educational tool for kids that can help them learn anything from advanced computer skills, math, engineering, architecture, art, and history. Kids also pick up life skills like creativity, problem-solving, exploration, and teamwork.
While playing Minecraft is exciting, you may want to take the gaming experience a step further by setting up a private Minecraft server. Fortunately, setting up a private Minecraft server is easy if you have some basic computer and networking skills.
In this guide, we’ll show you how to set up a private Minecraft server on Windows, Mac, and Linux VPS.
How to Set Up a Private Minecraft Server
Before you dive into the niceties, there are some basic steps you’ll need to follow.
At the very least, you’ll need to:
- Update Java to the latest version
- Choose server location
- Download and install the most recent version of Minecraft server software
- Start the server
- Check whether the server is accessible
Choosing Your Server Type: Making the Right Decision
Recent feedback has prompted me to update this article with more direct instruction, so here you go!
Java vs Bedrock Server Considerations
Java Edition Servers:
- Pros:
- Extensive mod support (Forge, Fabric)
- More server software options
- Better admin tools
- Larger plugin ecosystem
- Free server software
- Cons:
- Higher system requirements
- PC players only
- More complex setup
- Requires port forwarding
Bedrock Edition Servers:
- Pros:
- Cross-platform play
- Lower system requirements
- Simpler setup process
- Mobile player access
- Better performance
- Cons:
- Limited modding
- Fewer hosting options
- Less customization
- Requires Xbox accounts
Hosting Options Comparison
1. Home Hosting (Free)
- Requirements:
- Decent PC (4GB+ RAM)
- Stable internet (10+ Mbps upload)
- Port forwarding access
- 24/7 PC operation
- Best For:
- 1-5 players
- Learning experience
- Complete control
- Cost-conscious users
2. VPS Hosting ($5-20/month)
- Providers:
- DigitalOcean
- Linode
- Vultr
- AWS Lightsail
- Best For:
- 5-20 players
- Technical users
- Custom configurations
- Multiple game servers
3. Minecraft-Specific Hosting ($8-30/month)
- Providers:
- Apex Hosting
- Shockbyte
- BisectHosting
- MCProHosting
- Best For:
- 10-50+ players
- One-click setup
- Built-in support
- Beginners
4. Free Hosting Services
- Options:
- Aternos (queue wait times)
- Minehut (limited RAM)
- Server.pro (advertisements)
- Limitations:
- Server sleeps when empty
- Limited customization
- Performance restrictions
- Forced shutdowns
Home Server Setup: Complete Walkthrough
System Requirements
Minimum Specifications:
- RAM: 1GB + 100MB per player
- CPU: Dual-core 2.5GHz+
- Storage: 10GB free space
- Network: 10 Mbps upload
- OS: Windows 10/11, Linux, macOS
Recommended for 10 Players:
- RAM: 4-6GB allocated
- CPU: Quad-core 3.0GHz+
- Storage: 25GB SSD space
- Network: 25 Mbps upload
- OS: Ubuntu Server or Windows
Step-by-Step Java Server Setup
Step 1: Download Server Software
Vanilla Server:
- Visit minecraft.net/download/server
- Download server.jar
- Create dedicated folder
- Place server.jar inside
Paper Server (Recommended):
- Visit papermc.io
- Select Minecraft version
- Download Paper jar
- Better performance than vanilla
Step 2: Initial Server Configuration
Create start.bat (Windows) or start.sh (Linux/Mac):
Windows start.bat:
batch@echo off
java -Xmx4G -Xms4G -jar server.jar nogui
pause
Linux/Mac start.sh:
bash#!/bin/bash
java -Xmx4G -Xms4G -jar server.jar nogui
Memory Allocation Guide:
- -Xmx = Maximum RAM
- -Xms = Starting RAM
- 1-5 players: 2G
- 5-10 players: 4G
- 10-20 players: 6G
- 20+ players: 8G+
Step 3: First Run Configuration
- Run start script
- Accept EULA (eula.txt → true)
- Let server generate world
- Stop server (type “stop”)
- Configure server.properties
Essential server.properties Settings:
properties# Server Name
motd=Welcome to My Private Server

# Player Limits
max-players=20
white-list=true

# World Settings
difficulty=normal
gamemode=survival
spawn-protection=16

# Performance
view-distance=10
simulation-distance=8

# Security
online-mode=true
enable-command-block=false
Network Configuration and Security
Port Forwarding Setup
Router Configuration:
- Find Router IP:
- Windows:
ipconfig→ Default Gateway - Mac/Linux:
netstat -nr | grep default - Usually: 192.168.1.1 or 192.168.0.1
- Windows:
- Access Router Admin:
- Open browser to router IP
- Login (check router sticker)
- Find “Port Forwarding” section
- Create Port Forward Rule:
- Service Name: Minecraft
- Port Range: 25565-25565
- Local IP: Your PC’s IP
- Protocol: TCP
- Enable: Yes
- Find Your Public IP:
- Visit whatismyipaddress.com
- Share with friends
- Changes with router restart
Alternative: Using Ngrok (No Port Forwarding)
- Download from ngrok.com
- Extract to server folder
- Run:
ngrok tcp 25565 - Share generated URL
- Free tier limitations apply
Server Security Best Practices
Whitelist Configuration:
/whitelist on
/whitelist add PlayerName
/whitelist list
/whitelist remove PlayerName
Essential Security Plugins:
- CoreProtect
- Block logging
- Rollback griefing
- Chest access logs
- Command:
/co rollback
- LuckPerms
- Permission management
- Group creation
- Rank systems
- Command prefixes
- EssentialsX
- Spawn protection
- Home/warp system
- Economy features
- Ban management
Backup Automation:
batch:: backup.bat - Run daily
@echo off
set backup_path=C:\MinecraftBackups\
set server_path=C:\MinecraftServer\

echo Backing up server...
xcopy %server_path%world %backup_path%%date:~-4,4%%date:~-10,2%%date:~-7,2%\ /E /I
echo Backup complete!
Performance Optimisation
Server Configuration Optimisation
Bukkit.yml Optimizations:
yamlspawn-limits:
  monsters: 50
  animals: 10
  water-animals: 5
  ambient: 1

chunk-gc:
  period-in-ticks: 400
  load-threshold: 300

ticks-per:
  animal-spawns: 400
  monster-spawns: 10
  autosave: 6000
Spigot.yml Key Settings:
yamlworld-settings:
  default:
    entity-activation-range:
      animals: 16
      monsters: 24
      misc: 8
    merge-radius:
      item: 3.0
      exp: 4.0
    mob-spawn-range: 4
    view-distance: default
Paper.yml Performance:
yamlworld-settings:
  default:
    max-auto-save-chunks-per-tick: 6
    optimize-explosions: true
    mob-spawner-tick-rate: 2
    container-update-tick-rate: 3
    grass-spread-tick-rate: 4
Lag Prevention Strategies
Common Lag Causes:
- Too Many Entities
- Solution:
/kill @e[type=item] - Limit mob farms
- Clear ground items
- Solution:
- Redstone Contraptions
- Limit clock circuits
- Optimize designs
- Use slower tick rates
- Chunk Loading
- Limit render distance
- Pre-generate world
- Use chunk limits
- Plugins
- Remove unused plugins
- Update regularly
- Monitor with Timings
Pre-Generation Command:
/worldborder center 0 0
/worldborder set 5000
/chunky radius 2500
/chunky start
Advanced Server Management
Plugin Recommendations by Category
Essential Plugins:
- EssentialsX – Complete server toolkit
- Vault – Economy/permissions API
- WorldEdit – Building assistance
- WorldGuard – Region protection
- PlaceholderAPI – Variable support
Quality of Life:
- Dynmap – Web-based world map
- DiscordSRV – Discord integration
- GriefPrevention – Land claiming
- ChestShop – Player economies
- TreeAssist – Tree falling
Fun Additions:
- McMMO – RPG skills
- Jobs Reborn – Job system
- Quests – Quest creation
- MythicMobs – Custom mobs
- Slimefun – Tech mod
Creating a Server Community
Discord Integration Setup:
- Create Discord server
- Install DiscordSRV
- Configure bot token
- Link channels
- Set permissions
Server Rules Template:
=== SERVER RULES ===
1. No griefing or stealing
2. No offensive language/content
3. No hacking/exploited clients
4. Respect other players' builds
5. No lag machines
6. PvP only in designated areas
7. Report bugs, don't exploit
8. Have fun and be creative!
Rank System Example:
- Guest: Basic permissions
- Member: After 5 hours playtime
- Trusted: Building in spawn area
- Helper: Kick/mute permissions
- Moderator: Ban/rollback access
- Admin: Full server control
Troubleshooting Common Issues
Connection Problems
“Can’t Connect to Server”
- Check server is running
- Verify port forwarding
- Confirm firewall exceptions
- Test with local IP first
- Check online-mode setting
“Connection Timed Out”
- Increase server timeout
- Check internet stability
- Verify correct IP/port
- Disable VPN/proxy
- Lower render distance
Performance Issues
Server Lag Fixes:
- Check TPS:
/tps(20 = perfect) - Entity Count:
/minecraft:kill @e[type=!player] - View Timings:
/timings report - Restart Schedule: Every 6-12 hours
- RAM Allocation: Increase if needed
Client Lag Solutions:
- Install Optifine/Sodium
- Reduce graphics settings
- Allocate more client RAM
- Update graphics drivers
- Close background programs
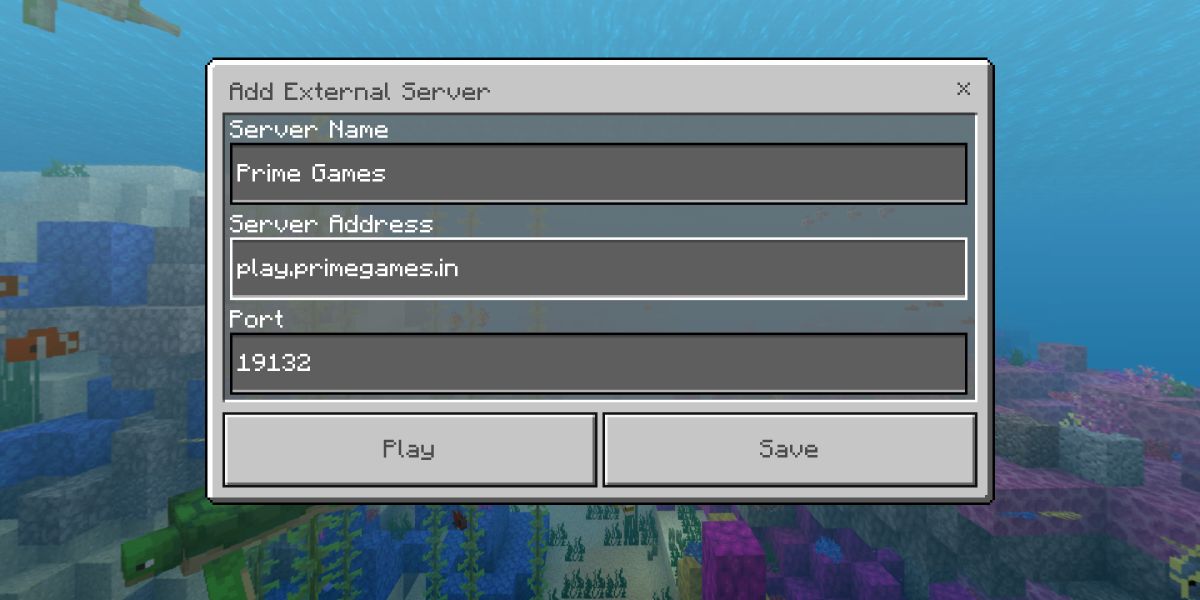
Bedrock Server Specifics
Bedrock Dedicated Server Setup
Download and Setup:
- Visit minecraft.net/download/server/bedrock
- Extract to folder
- Run bedrock_server.exe
- Configure server.properties
- No Java required!
Key Differences:
- Port: 19132 (UDP not TCP)
- No plugin support
- Behavior packs only
- Xbox Live authentication
- Better mobile performance
Bedrock server.properties:
propertiesserver-name=My Bedrock Server
gamemode=survival
difficulty=easy
allow-cheats=false
max-players=10
online-mode=true
white-list=true
server-port=19132
level-name=Bedrock level
Conclusion
Setting up a private Minecraft server opens unlimited possibilities for customized gameplay with friends. Whether you choose the simplicity of hosted solutions or the control of self-hosting, the key is starting small and expanding as needed. Focus on security, regular backups, and community building. Remember: the best server is one where players have fun and keep coming back. With this guide, you’re ready to create your own Minecraft world where memories are made block by block. Happy hosting!
If you prefer the previous content, this is it:
Consider Your Options
To run a Minecraft server from home, you don’t need a top-of-the-line system. However, for you to play and run the server on the same machine smoothly, your system needs to be powerful.
But what if, for whatever reason you don’t want to host your Minecraft server from home? The most ideal solution is to use a game server provided by a hosting provider.
With a dedicated game server, you don’t have to deal with the hassle of managing server hardware. Also, you don’t have to worry about poor connections or lag when in multiplayer mode.
With that in mind, now let’s dive into the particulars.
Setting up a Minecraft Server on Windows
Get the latest Java version
Being a Java-based sandbox game, the first thing you’ll want to do is to download and install the latest version of Java in your Windows PC.
Pick a location for your Minecraft server files
The next step is to identify a location in your PC where you’ll set up and run the server. You can create a dedicated folder on your desktop or in any other location on your PC. The point here is to keep the configuration files in one place and organized.
Download Minecraft server
Once you’ve identified a location for your Minecraft server files, go ahead and download the most recent version of Minecraft server software from Minecraft’s official website.
The downloaded file will be in .jar format. Move it to the destination folder you chose above and double-click it to start the server. The server configuration files will be created but you’ll need to make some adjustments before the server is ready to use.
At this point, you’ll be required to accept the end-user license agreement (EULA). Accepting the EULA will enable you to start the server.
To agree to the EULA, double-click on the eula.txt file and then replace the eula=false line of text to eula=true. Save then close.
Start the server
You can now start your Minecraft server. There are two ways you can do this.
You can choose to double click the .jar file. With this option, however, you might be required to allow the server through a firewall.
The other option is to open the dedicated Minecraft server folder where the server files were installed and start the server by executing this command:
java -Xmx1024M -Xms1024M -jar minecraft_server.jar nogui
Your server is now up and running and you can start inviting friends to join in via your local or public IP address. However, it’s advisable to check whether your server is accessible by entering your public IP into the Minecraft Server Checker.
Setting up a Minecraft Server on Mac
The procedure is quite similar to that of setting up on Windows OS.
Update or install Java
All new MacOS versions come with Java. However, you can check your version by navigating to System Preferences then clicking on Java. You’ll be able to see your Java version from the Java control panel.
For computers running on older macOS versions, you’ll have to download the legacy version of Java from the Apple website.
Choose a location to store your server files
Create a destination folder on your desktop or any other place you prefer where you’ll store your Minecraft server configuration files.
Download the Minecraft server set-up program
Now visit the official Minecraft website and download the server software. You will get a .jar file in your Downloads folder. Copy the file to the destination folder.
Now open the TextEdit program – select the plain text option and enter the following command sequence:
#!/bin/bash
cd “$(dirname “$0″)”
exec java -Xms1024M -Xmx1024M -jar minecraft_server.jar nogui
In the same file directory where the server files are stored, save this file as startmc.command. But for this file to work, you’ll need “execute” permission.
To grant permission, open your terminal and type in the following command: chmod a+x startmc.command
Start the server
If the above steps are followed correctly, double-clicking the startmc.command should start the server. A new terminal window will pop up and you might get a directory warning or missing file error message. This should not be a cause for alarm as it happens whenever you run a Minecraft server for the first time.
Set Up a Minecraft Server an Linux VPS
As aforementioned, some players may not be inclined to the idea of hosting their Minecraft server at home. A cheap alternative would be to spin up a Linux VPS hosting plan.
With a Linus VPS, you’ll enjoy better network security, server-grade hardware, and of course, lagging will be a thing of the past. You can check out this article from and learn how you can set up a private Minecraft server on Linux VPS.
Conclusion
With a private Minecraft server, you have more control. You can modify the rules of the game, invite your buddies to join in for some fun, install mods, and more. Similarly, parents can have control over whom you’re their kids interact with online.
Article Summary
Minecraft, a sandbox adventure game developed by Mojang, has sold over 176 million copies as of 2019, making it the second-most popular video game in the world after Tetris. Minecraft’s popularity is driven by its ability to offer players unlimited possibilities to create a 3-dimensional world using a variety of different blocks, which requires a lot of creativity. It is also an educational tool for kids that can help them learn anything from advanced computer skills, math, engineering, architecture, art, and history. Setting up a private Minecraft server is easy if you have some basic computer and networking skills.

Latest
-

The Planet Crafter Is Coming to Consoles in July
-
Go North: Atmospheric Maze Adventure
-
Unyverse: Afrofuturist Action RPG
-
The Mound: Omen of Cthulhu Demo Launches During Steam Next Fest
-
Woodo: Handcrafted Wooden Puzzle Game Captures Childhood Wonder
-
The Walking Dead: Streets of Survival
-
Skatesterre: New Arcade Skateboarding Game Announced for Summer 2026 Release
-
My Top 10 Boxing Games (2026)


Latest Previews
Lost Gems
-
Top 10 Meta Quest 2 Games For Children
-
Stormforce Gaming & The Prism iCue 6209
-
Licensed Xbox Games for Kids 2022/23
-
New Mods for Minecraft Bedrock 2023
-
The 6,6,6 Scariest Games of 2022
-
5 Great Udemy Courses For New Game Developers
-
Hearthstone Alternatives For Lovers of Card Games
-
My Top 10 Star Wars Games of All Time
-
5 of the Most Interesting Mobile Games at EGX Rezzed
-
11 Wicked Witches in Video Games | Halloween Special
-
Beginners Guide to Pokemon Go [Updated]
-
Advanced 2D and 3D Game Development Software
-
My Top 5 Boxing Games
-
Parents Guide to Minecraft
-
10 Great Kids Games From 2016 on Xbox One


You must be logged in to post a comment Login